How many blog posts get added to web each day? Certainly millions. Do you think on how to make your post different than the crowd? Probably it’s the time to think now. Attractive post design is a key part to grab the user attention. You can make your post more attractive and readable using images.

Photo by masaaki
Images enhance your blog by increasing visual interest of the user. Generally people don’t have time to read your whole blog post till end. Most of the readers don’t have time to read your content till the end. Moreover if your posts are without any design, text highlights or images then reader will leave the page by reading first few lines only.
How to engage users in your content? Obviously killer content comes first. But if your post looks attractive then user will get more engaged till end of the post.
This post basically focusing on following elements:
- Where to find the images?
- How to capture and enhance images from different tools? (like SnagIt tool)
- How and where to embed images in your post?
Where to find images for your blog post?
This is a big question. Many bloggers think that images available on internet web pages are free to use. But these images are copyrighted to some people. Do not use copyrighted images on your blog. Fortunately you can download free images from some legal sources.
Sources to download the images:
To know more resources probable you want to check the post 100 legal sources to download images.
These are some popular and quality image sources. Some are charging a small amount for downloading the images. Most of the Google images are copyrighted images. So you can’t use them. My best source to get images is yahoo Flickr.
Flickr is extensive collection of free images. Many Flickr users offered images to download under Creative commons license. You can download images filed under Creative Commons license and you can use them in your blog post by giving a photo credit to original author. To know different Creative commons license types visit Flickr.
How to search for Good images of your interest on Flickr:
1) Once you visit this flickr page click on “See more” link to view more images under that license type.
2) You can search images with specific title or tags. By default you will see “Most relevant” images.
3) Click on “Most interesting” link to get images that will catch user attention. Search for images as per your requirements. Then you can download these images with different sizes.
4) Click on image of your interest. Then click “All sizes” link to see all available sizes for that image. The available image sizes are:
- Square (75 x 75)
- Thumbnail (100 x 100)
- Small (240 x 240)
- Medium (500 x 500)
- Large (1024 x 1024)
- Original (3692 x 3692)
5) Select the image size you want to use and click on “Download image” to download it to your local hard drive.
That’s it!
Now you have the images that you might want to enhance. Focusing on particular part of the images using image magnifying and marking with arrows can be done using image processing tools like SnagIt.
How to capture images using SnagIt:
SnagIt is a very popular tool for capturing and processing of images. Though it is not freely available you can download one free SnagIt version 8.0 from here.
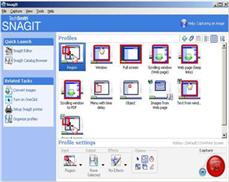 You can almost capture any type of image from SnagIt. Following are some of the great features of SnagIt tool:
- Make movies of your desktop actions
- Capture scrolling window web page
- To capture all images from a web page
- Extract text from a window
- To insert watermark on your images
- Enhance images by inserting text and marking with arrows
- To magnify specific part of the image
How to capture widely used image formats using SnagIt:
1) Capture Window or Full screen: You can capture full window or full screen for the web page of your interest. This feature is extremely useful when you want to show screenshots of particular web page. Like if you are writing post on “How to drive traffic from Digg?” then you would like to insert digg screen snap in your post.
Open SnagIt software then select-> Window then click on red capture button on right bottom. The image will get captured and will be shown in SnagIt editor for enhancements. If this web page snap is too big to fit into your post then you can resize image using “Resize Image” option. Keep the aspect ratio same in this case. This way you can fit the image in any of your page.

(Image: Digg screenshot taken from SnagIt)
Also see Example of different web site Screen shots used in post content.
 2) Capture scrolling web pages: SnagIt can capture web pages requiring to scroll down. You can capture whole page from top to bottom and can resize it to place anywhere you want.
Just select SnagIt option “Scrolling window” and select the scrolling direction by mouse. Capture the complete web page and resize its width or height to fit it to your page.
Also see live example of full web page image used in post.
3) Download all Images from web page: Specify a web page from where you want to download all the images. All images from this web page will be saved to your hard drive. Keep in mind that images you are downloading should not be copyrighted to use it on your web page.
4) Extract text from message window: You can capture the text of error messages windows. This is extremely useful when you want to report any specific error to other webmasters or readers through your post. All text from popup error message window can be extracted and saved to disk.
5) Record desktop movies: You can record desktop movies of small size using SnagIT.
6) Enhance images: Put watermark on the images, enhance images by inserting arrows to point some image part. If you want to spotlight or magnify specific part of the image, you can do so using SnagIt image editor.
See the examples below:
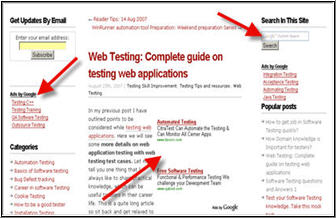
(Image enhancements using SnagIt)
Also see live Example of image Spotlight and Magnify.
7) Save images with different formats: You can almost save image in all formats. Some of the popular used formats are: JPG, GIF and PNG to reduce image size.
How and where to embed images in your post?
You should be very careful while inserting images in your blog. Your blog design should not get break by inserting large images and images at wrong places. Also do not overuse images in any post. Keep in mind that images are just to support your content and not vice versa.
Popular places to place image in your post:
To avoid placing all the snapshots in this post I will link to each of the sample post to see the image placement example:
1) Top right or left corner of the post: This is very popular place used nowadays by most of the bloggers. For this place you can use square or rectangular image formats. This also makes your RSS feed more interesting to read.
Example of Top right Corner image placement.
2) Rectangular image just below the post title: Place image just below the title of your post. This should be rectangular image and should fit to your post page width.
Example of rectangular image placed just below the post title.
Example of image placed below title and some content.
3) Place images in between the content: You can support your writing by placing images just at left, right or middle of your content. This makes post very attractive and interesting to read.
Example Images placed in between the content to support your writing.
4) If you are writing a “How-to” resource post then for each resource title you can place the image or resource company logo at left cornet just below the resource title.
Example Resource logos under each resource title.
Conclusion:
Hope this article will help you in all aspects of Finding free images over the web, capturing, enhancing and using these images in your blog post. This will definitely make your post stand out from the crowd. Good content, good post design and marketing of your article, these are the three key points for successful blogging!
Nice overview of Snagit functionality!
Thanks,
Peter
Vry informative post buddy. I always try to use images in all my post. Thanks for the links for finding free images. They will really come in handy.
Excellent post. Agree it makes a big difference to have suitable images, some tips are new to me
Thanks for the SnagIt Recommendation. I loved that you talked about image copyright. I know a lot of bloggers struggle with this. I used to use Google Images (ironic you mentioned it lol) and now I’m switching to Flickr to search for my images.
Good work. Stumbled!
That was really a great guide…very helpful.
hi whats up
hiiiiiiii
nice tips..thank you for the effort. I appreciate it.
Very informative post. It changes my life.
thx you very much.
nice informations.
thx u very much i like this thig